Check this out!
Simple syrup is a delicious way to enhance the flavor and maintain the vibrant color of fruit when canning. A heavier syrup contains more sugar and less water, while a very light syrup uses more water and a limited amount of sugar. Of course, if you must watch your sugar intake and are on a low-glycemic diet, there are other options such as:
- agave nectar
- honey
- maple syrup
- unsweetened natural fruit juice
Each of these can be used to make syrup for canning, or you may use an unsweetened natural fruit juice like apple, pineapple, or grape juice.

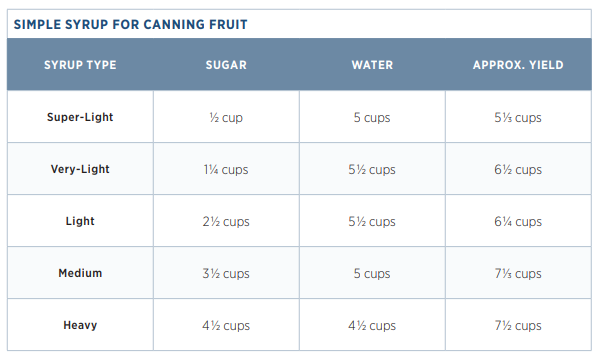
Simple Syrup Chart for Canning Fruit
Use this handy chart and the instructions that follow to create a simple syrup with your desired level of sweetness:

Instructions
To make simple syrup using sugar:
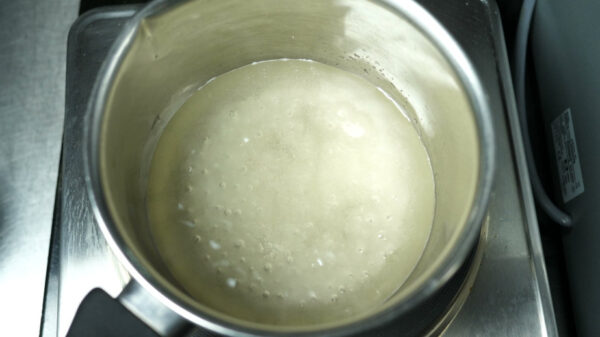
- Combine the above-mentioned sugar and water in a deep pot or medium saucepan and bring the mixture to a boil over medium heat, stirring constantly to make sure the sugar is fully dissolved.
- As soon as it begins to boil, reduce the heat to low and simmer for 1 minute, then remove the pot from the heat.
- Cover the pot to keep the syrup warm while you fill your jars.
To make simple syrup with sweeteners like honey, agave nectar, or maple syrup:
- Combine 4 cups of water and 2 cups of sweetener in a deep pot or medium saucepan and bring to a boil over medium heat.
- Boil for 1 minute, then remove the pot from the heat.
- Cover to keep the syrup warm while you fill your jars. This makes about 6 cups of syrup.
To make simple syrup with natural fruit juice such as apple, pineapple or grape:
- No added water is necessary.
- You’ll need roughly 1½ cups of fruit juice per quart jar to cover the fruit, and ¾ cup to 1 cup to cover the fruit in pint jars.
- Simply raw back your jars with fruit and pour the fruit juice directly into each jar, keeping a 1/2-inch headspace.
Regardless of which type of syrup you choose, you will raw pack the fruit into each jar, being sure to tightly pack as much fruit into each jar as possible. Add your simple syrup or fruit juice to each jar being sure to keep a 1/2-inch headspace. Remove any trapped air bubbles and readjust headspace by adding my syrup if necessary, being sure to maintain the 1/2-inch headspace. Wipe your jar rims with a washcloth dipped in vinegar, apply lid and ring, then hand tighten. Process your jars according to your recipe.
If you are interested in downloading a free bonus chapter ‘PRESSURE CANNING FRUITS‘ from my cookbook, The Complete Guide to Pressure Canning, click here.
Happy Canning!
xo
Diane, The Canning Diva
www.canningdiva.com


