

Beginner Guide to Milling Wheat Berries
Fresh flour changes the way a kitchen works. Once you smell wheat berries turning into warm, fragrant flour on your own counter, this beginner guide to milling wheat berries starts to feel less like a hobby and more like a practical pantry skill.
For households working toward greater food security, milling grain at home makes sense. Wheat berries store far longer than flour, they give you more control over quality, and they help you turn one shelf-stable staple into bread, pancakes, muffins, pasta, and more. Like
(I sometimes use affiliate links in my content. This will not cost you anything but it helps me offset my costs to keep creating new
By Diane Devereaux | The
Last updated: May 8, 2026
Key Takeaways
- Wheat berries store significantly longer than freshly milled flour when kept in cool, dry, pest-free conditions.
- Freshly milled flour offers fuller flavor, improved aroma, and greater control over grain quality.
- Hard red and hard white wheat are versatile choices for bread baking, while soft white wheat is better suited for pastries and tender baked goods.
- A dedicated grain mill produces more consistent flour than most blenders or food processors.
- Fresh-milled flour absorbs liquid differently than store-bought flour and may require recipe adjustments.
- Start by replacing only part of the flour in familiar recipes until you understand how fresh flour behaves.
- Milling smaller amounts more frequently helps preserve freshness and reduces waste.
- Proper storage matters for both wheat berries and flour to protect quality and shelf life.
- Learning to mill wheat berries is a practical kitchen skill that supports preparedness, self-reliance, and scratch cooking.
Why milling wheat berries is worth learning
Store-bought flour is convenient, but it has limits. Once flour is milled, it begins losing freshness, aroma, and some of the natural oils found in the bran and germ begin to oxidize from exposure to air eventually becoming rancid. Whole wheat flour in particular can go rancid faster than intact grain which is why it is best to only mill what you need for the recipe.
Wheat berries, on the other hand, are one of the most dependable long-term pantry ingredients you can keep on hand. Stored in cool, dry, pest-free conditions, they remain stable far longer than flour. That matters if you are building a resilient pantry, buying in bulk to control grocery costs, or simply trying to waste less.
There is also a quality difference. Freshly milled flour behaves differently in dough and batter. It often has a fuller flavor, a slightly sweeter aroma, and more character than bagged flour from the store. That does not mean every recipe becomes easier overnight. Fresh flour absorbs moisture differently, and some recipes need adjustment. But once you understand that trade-off, the payoff is substantial.
Beginner guide to milling wheat berries: start with the right grain
Not all wheat berries produce the same results. If you are new to milling, begin with a small amount of one type and bake with it before buying in bulk.
Hard red wheat is a strong bread wheat with a deeper, heartier flavor. It is excellent for rustic loaves, sandwich bread, dinner rolls, and pizza dough. Hard white wheat has similar protein strength but a milder taste, which many families prefer for everyday baking. It is often a smart starting point if you want whole grain flour that tastes lighter.
Soft white wheat is lower in protein and better suited for tender baked goods like biscuits, muffins, cakes, and pastries. Durum is ideal for pasta, but it is less common as an all-purpose starting grain.
If your goal is one dependable pantry wheat, hard white or hard red wheat is usually the most versatile place to begin. From there, you can branch out based on how you cook and bake.
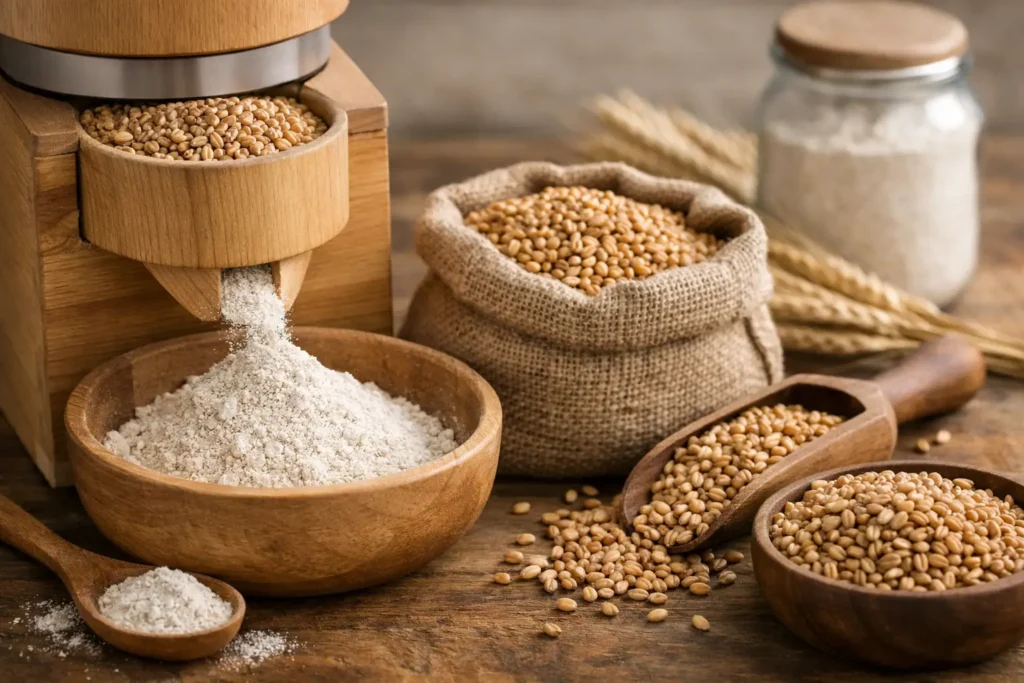
What you need to mill wheat berries at home
You do not need a complicated setup, but you do need the right kind of mill. Wheat berries are too hard for many standard kitchen appliances. A blender or food processor may crack grain, but it usually will not produce consistent flour and can strain the machine.
A dedicated grain mill is the best choice. Electric mills are faster and easier for regular use, especially if you bake often or mill larger batches. Manual mills require more effort, but they can be useful for preparedness, backup power situations, or households that want a non-electric option.
Stone mills and impact mills each have strengths. Stone mills offer grind flexibility and can handle a range of textures, from cracked grain to fine flour. Impact mills are often fast and effective for fine flour, though they may be less flexible for coarse settings. Neither is automatically better for every household. It depends on how often you bake, how much flour you need at one time, and whether emergency readiness matters in your purchasing decision.
You will also want airtight containers for your grain and flour, a scoop, and a clean dry workspace. Milling is straightforward, but keeping everything dry and clean matters for both quality and storage life.
How to mill wheat berries step by step
The process itself is simple. The skill comes in learning what grind and quantity fit your recipes.
Start by checking your wheat berries. They should be clean, dry, and free from any signs of moisture, pests, or off odors. Do not wash wheat berries before milling. Added moisture can create problems in both the mill and the flour.
Set up your grain mill according to the manufacturer instructions. If your mill allows grind adjustments, begin with a medium-fine or fine setting for general baking. Measure only what you need for the next few days if possible. Fresh flour is at its best when used soon after milling.
Feed the wheat berries into the mill steadily and collect the flour in a clean container. Let the flour rest a few minutes before using if it feels warm from milling. Heat can be normal depending on the machine, but flour should still smell sweet and fresh, never scorched.
For very light baked goods, some home bakers sift out part of the bran. For everyday whole grain baking, many use the flour as is. There is no single correct method here. If you want the nutrition and texture of whole grain, keep it intact. If you are easing your family into home-milled flour, sifting or blending it with other flour can make the transition easier.
Using fresh-milled flour without ruining your recipe
Freshly milled flour behaves differently than store-bought flour because it still contains the bran, germ, and natural oils of the whole grain. Those components affect texture, hydration, flavor, and shelf life in ways many bakers notice immediately. If you swap it cup for cup into every recipe, you may get denser bread, drier muffins, or dough that behaves differently than expected. That does not mean the flour is inferior. It simply means fresh whole grain flour often requires small adjustments in liquid, resting time, or technique.
Start by replacing only part of the flour in familiar recipes. Use 25 to 50 percent fresh-milled flour in pancakes, muffins, cookies, and sandwich bread. That gives you room to learn the texture and flavor without throwing off the structure of the recipe too much.
For yeast bread, expect to adjust hydration. Fresh-milled flour often needs a bit more water. Letting the dough rest after mixing helps the bran absorb moisture and can improve texture. If the dough seems rough at first, give it time before adding too much extra flour.
For tender baked goods, soft wheat generally produces better texture and a lighter crumb than hard wheat varieties. If hard wheat is the only grain you have available, you can still bake successfully with it, though the final product may be denser or more rustic in texture. Understanding how different wheat varieties behave helps you choose the best grain for the recipe rather than expecting every flour to perform the same way.
Storage matters: berries and flour are not the same
One of the biggest advantages of milling at home is long-term grain storage. Wheat berries are a preparedness staple because they hold well when protected from moisture, oxygen, heat, and pests. Food-grade containers stored in a cool, dark, dry place are ideal.
Freshly milled flour is different. Because the oils in the bran and germ are exposed, flour has a shorter shelf life than intact berries. For best quality, mill what you can use soon. If you need to store flour longer, keep it in airtight containers away from heat and light. Refrigeration or freezing can extend freshness, especially for whole grain flour.
Always trust your senses. Flour that smells stale, sour, or rancid should not be used.
Common mistakes in a beginner guide to milling wheat berries
- The first mistake is buying a large quantity of grain before knowing what you like to bake. Start smaller. Learn your preferred wheat type, then stock up with confidence.
- The second is expecting home-milled flour to act exactly like white all-purpose flour. It will not. Fresh whole grain flour brings more flavor and nutrition, but it also asks for small recipe adjustments.
- The third is milling too much at once. It is tempting to fill jars and feel accomplished, but freshness is one of the main benefits here. Mill for your near-term use and keep the berries whole for long-term storage.
- The fourth is overlooking maintenance. Grain mills need routine cleaning and proper use. Follow the manufacturer instructions and do not run materials through the mill that it is not designed to handle.
Building this skill into a self-reliant kitchen
Milling wheat berries is not just for serious bakers. It is for any household that wants more control over staple foods. When you can store whole grain, mill what you need, and turn it into nourishing meals, you have one more dependable skill that supports readiness and reduces reliance on the grocery shelf.
Like any heritage kitchen practice, confidence comes from repetition. Your first loaf may be heavier than expected. Your first batch of muffins may need more liquid. That is part of learning. Keep notes, adjust one variable at a time, and treat the process as practical education, not perfection.
A well-stocked pantry is strongest when it is built on ingredients you know how to use. Wheat berries are one of those ingredients. Learn to mill them well, and you are not just making flour. You are building a kitchen that is better prepared, more capable, and well fed.
A: Yes, however freshly milled flour behaves differently than store-bought all-purpose flour because it contains the bran, germ, and natural oils of the whole grain. It often absorbs more liquid and can create denser baked goods if substituted cup for cup. Beginners usually have the best success replacing 25 to 50 percent of the flour in familiar recipes while learning how fresh-milled flour performs.
A: Wheat berries can remain stable for upwards of 25 years years when stored properly in airtight, food-grade containers away from heat, moisture, light, and pests. Their long shelf life is one reason they are popular for bulk pantry storage and preparedness kitchens. Freshly milled flour, however, has a much shorter storage life and is best used soon after grinding for optimal flavor and quality.
About the Author:
Diane Devereaux, The